Price Range Slider Using HTML CSS and JavaScript

Price Range Slider HTML CSS JavaScript

If you want to create JavaScript Price Range Slider then this tutorial will help you. Price Range Slider is used in different places to determine the minimum and maximum value of a price.

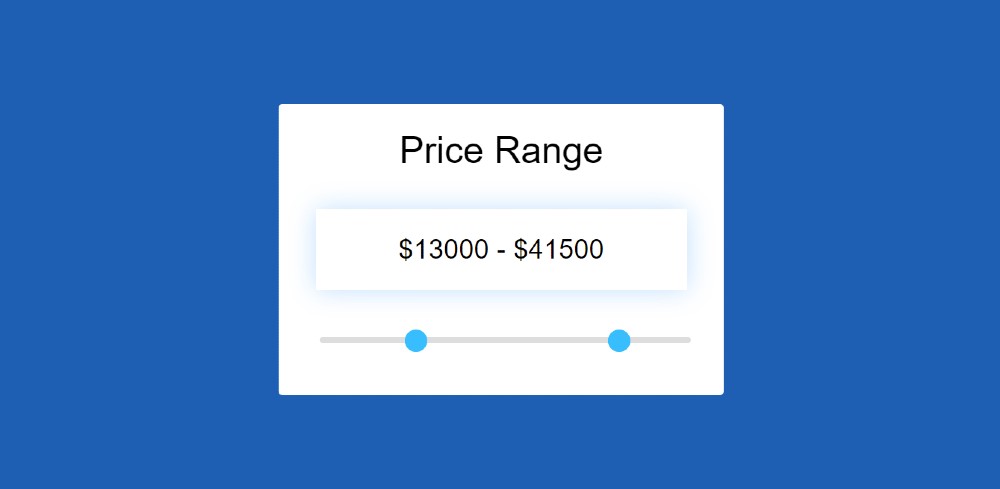
You can create this kind of price range slider javascript in many ways. However, the design that I have shared here is absolutely simple. This range slider is made with basic HTML, CSS, and javascript. There are two handles that allow you to set the minimum and maximum values.

Price Range Slider HTML CSS JavaScript

Price range slider HTML Search filters for different types of eCommerce websites. Which will show the result to the user depending on his price value.

I have fully explained the code used to make the Price Range Slider. If you are absolutely Beginner then there is no reason to worry.

Although it is not fully functional, only the basic design has been made here. You can watch the demo below to know how this Price Range Slider HTML CSS works.


See the Pen Untitled by Shantanu Jana (@shantanu-jana) on CodePen.


Hopefully, the preview above has completely helped you to know how it works. Here is the complete source code for enhancing this design. First, a box has been created on the webpage where all the information can be found. 

There is a heading, there is a result box in which the price minimum maximum value can be seen, then there is a range slider.

I have taken the help of HTML, CSS, and JavaScript to create this Javascript Price Range Slider. First I have added all the information using HTML. I designed it using CSS. Finally, I have implemented this Price Range Slider using JavaScript.

Price Range Slider HTML Code

The following HTML codes have been used to add all the information in this slider. First the basic structure, then a text, then the value view of the range slider, and a range slider with two handles. Copy the following Html code and add it to your Html file.


<div class="slider">

  <p>Price Range</p>

  <div class="range-slider">
    <span class="rangeValues"></span>
    <input value="1000" min="1000" max="50000" step="500" type="range">
    <input value="50000" min="1000" max="50000" step="500" type="range">
  </div>

</div>


Design Price Range Slide using CSS

Now is the time to design this Price Range Slider using CSS. The basic design has been done first with width: 300px and white background used. Then I designed all the rest of the information in this HTML Price Range Slider.


body{
  background-color: rgb(46, 4, 214);
  font-family: sans-serif;
}

.slider{
  padding: 30px; 
  border-radius: 3px;
  top: 50%;
  position: absolute;
  left: 50%;
  transform: translate(-50%, -50%);
  background-color: rgb(255, 255, 255);
}

.range-slider {
  width: 300px;
  text-align: center;
  position: relative;
  padding-bottom: 20px;
}
p{
  text-align: center;
  margin-top: -10px;
  font-size: 30px;
  color: rgb(7, 77, 189);
}

.range-slider .rangeValues {
  display: block;
  box-shadow: 0 0 20px rgba(0,139,253,0.25);
  padding: 20px;
  font-size: 22px;
  margin-bottom: 35px;
}

input[type=range] {
  -webkit-appearance: none;
  border: 1px solid white;
  width: 300px;
  position: absolute;
  left: 0;
}

input[type=range]::-webkit-slider-runnable-track {
  width: 300px;
  height: 5px;
  background: #ddd;
  border: none;
  border-radius: 3px;
}

input[type=range]::-webkit-slider-thumb {
  -webkit-appearance: none;
  border: none;
  height: 18px;
  width: 18px;
  border-radius: 50%;
  background: #0273a0;
  margin-top: -6px;
  cursor: pointer;
  position: relative;
  z-index: 1;
}

input[type=range]:focus {
  outline: none;
}

input[type=range]:focus::-webkit-slider-runnable-track {
  background: #ccc;
}


Price Range Slide JavaScript Code

Now is the time to implement this Simple Price Range Slider using JavaScript. Very simple js code has been used here. If you know anything about JavaScript, you can easily understand the code used here.


function getVals(){
  // Get slider values
  let parent = this.parentNode;
  let slides = parent.getElementsByTagName("input");
    let slide1 = parseFloat( slides[0].value );
    let slide2 = parseFloat( slides[1].value );
  // Neither slider will clip the other, so make sure we determine which is larger
  if( slide1 > slide2 ){ let tmp = slide2; slide2 = slide1; slide1 = tmp; }
  
  let displayElement = parent.getElementsByClassName("rangeValues")[0];
//innerHTML property allows Javascript code to manipulate a website being displayed
      displayElement.innerHTML = "$" + slide1 + " - $" + slide2;
}

window.onload = function(){
  // Initialize Sliders
  let sliderSections = document.getElementsByClassName("range-slider");
      for( let x = 0; x < sliderSections.length; x++ ){
        let sliders = sliderSections[x].getElementsByTagName("input");
        for( let y = 0; y < sliders.length; y++ ){
          if( sliders[y].type ==="range" ){
     //oninput attribute fires when the value of an <input> element is changed
            sliders[y].oninput = getVals;
            // Manually trigger event first time to display values
            sliders[y].oninput();
          }
        }
      }
}

Hopefully, you have been able to create this Price Range Slider using the above code. If there is any problem in understanding the code, you can definitely comment.

I have already shared the design of another type of range slider. If for some reason it is difficult to copy and use the above codes, you can use the button below. Please comment on how you like this JavaScript Price Range Slider.